
I got this desk for free!
I know, it doesn’t look like anything too special just yet — but it was EXACTLY what I was looking for, and I can already picture where this desk will fit in our new farmhouse…
Plus, I never turn down free wooden furniture!

Obviously, the previous owner didn’t know much about painting — or that it was preferable to remove the hardware {and the drawers} before diving in with two different colors of paint and a VERY heavy hand.
And while I usually don’t spend the time sanding anything, this desk needed it. BAD.
There were lots of raised areas, drips, brush strokes, rough edges, etc. But nothing my little palm sander and some very coarse sandpaper couldn’t handle.
FRUGAL TIP — if you buy full sheets of sandpaper, you can cut 4 smaller rectangles that fit a standard palm sander perfectly.

So, after I removed all the drawers {and numbered them so I knew where to put them back}…

…and removed all the old hardware…

…I started sanding.
It didn’t take long to make a noticeable difference, and the result was a much smoother surface. Totally worth it!

Now for the fun part — painting!
I pulled out my very professional and expensive painting supplies and got to work.
F.Y.I. paper plates and small plastic containers work wonderfully for smaller projects like this desk 🙂

Oh, and these 4″ foam rollers are my go-to choice every time I paint furniture, cabinet doors, or anything else that needs to be really smooth. You can pick them up at any hardware store for MUCH cheaper than the full-size rollers.

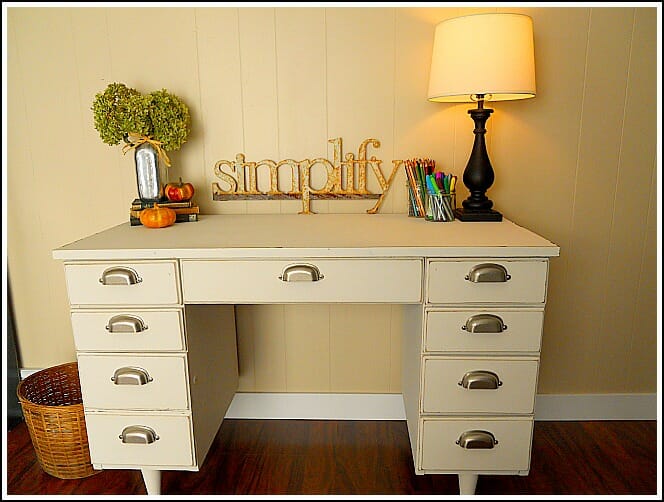
After 3 coats of Behr flat paint in Swiss Coffee, a little distressing around the edges, and new brushed chrome drawer pulls {Martha Stewart’s line at Lowes}, I have a brand new office area!


Here’s the BEFORE:
{One more time…just for kicks!}
And the AFTER:
I’d say it turned out alright!
See more in-depth painting tips here.
A. says
what a great desk/find! how did u end up getting it for free? curb side? can u make a post about getting (or finding!) free furniture?
ann @ mylifeasprose says
i *love* this!! thanks for the little tips on the rollers… i’m wanting to pick up a goodwill desk and do something similar, and your tips will come in handy! 🙂
Shannon says
Wow! You did an awesome job! I love the word art above the desk. I just re-did my office and am totally taking that idea!
I’m having a Christmas Card giveaway at my blog… stop by and enter!
Jana says
This is awesome!!
Rene@BargainHoot says
I love this desk and the retro feel!
Momma Mindy says
I am AMAZED that you salvaged that desk. What a great vision you had, and the ability to make it happen. Great job. I don’t think I’ll look at things on the curb or in the thrift store the same way after this….it will all be POTENTIAL!
Marsha says
WOW! You did an awesome job. Looks like a brand new piece!
Linda says
Great find and you made it look wonderful! it is always fun to get freebies and then make them over. Linda
Amanda says
I love it! It turned out so nice…your site is a constant source of inspiration to me. I have a wooden desk that is begging for the same treatment….maybe this will finally motivate me to spruce it up.
Becky says
Free is fabulous! It’s it amazing what some TLC will do for an old discard. Great job.
Judy says
Great job. It’s beautiful now. I found you at one of the link parties.
Biljana says
Great job, it looks so beautiful, bravo:))
Greetings from Europe, Biljana
Beth @ Wiccan Make Some Too says
I’d say it turned out better than just alright! It is an awesome desk now.
Real Housewife in MN says
Looks awesome! I love the hardware as well. Nice job!
Kim says
What a beautiful job! I love the name of the paint! Sounds yummy!
Sarah Reynolds says
not much else to say but STUNNING!
Love your vision.
Pattie @ Olla-Podrida says
Wow! What a transformation. I have so many projects I need to tackle that I’m overwhelmed. I really enjoyed watching you turn a sow’s ear into a silk purse.
Mr. Goodwill Hunting says
If its free…its for me. I need to get one of those handy sprayers.
Great transformation.
Mr. Goodwill Hunting
Chrissie says
Gorgeous transformation! I love the hardware and paint color. You distressed it just right, too!
Milehimama says
Obviously, the previous owner didn’t know much about painting
Probably anyone that has ever gotten furniture from me has said those exact words 😉
Looks great and I bet you’re loving all those drawers!
tara says
Wow!!!! That looks so great. I am looking for a desk just like this. Lucky :))
Sandy@Life Began in a Garden says
Looks great! I have desk in my garage right now that I am working on, unfortunately it is particle board, not solid wood. But it was free! And a coat of paint will make it totally work as my new sewing table. Now I just have to finish it…
kathy says
Your desk is just lovely –I am loving that Swiss Coffee color you used -very nice. -You should be very proud of the results –Kind of like the ugly duck that became a swan .
Jocelyn says
What an amazing makeover! Great job!
momstheword says
oooooh, very pretty! I like it much better now, and the door pulls are awesome. I like those little sponge rollers too. I also love your “simply” sign! Thanks for linking up to Making Your Home Sing Monday!
Loulou@thelifeofloulou.blogspot.com says
I love it…. It’s fabulous…
Lori E says
I turned out more than all right. I wonder if anyone ever sees the metamorphosis of something they no longer wanted and then the kick themselves for not seeing the potential right in front of them.
she says
Oh, your desk turned out just perfectly! Love the look and what a great job you did.
Be a sweetie,
Shelia;)
Stephanie says
Absolutely wonderful, you did a fabulous job!!
Suesan says
You did a great job. That sanding totally paid off.
Brenda @ a farmgirl's dabbles says
Beautiful! I’ve rescued many desks and bureaus – some were free, and I’ve never paid more than $15 for a piece. I’ve now run out of rooms that need a painted desk. 🙂 Those peg legs on yours are different – very fun!